Friday, March 30, 2007

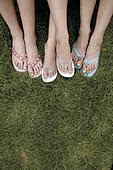
Custom Wedding Sandals


Looking for a little comfort on your wedding day? Try embellishing some simple white sandals using these ideas from Rebecca.


You Can create your own custom wedding sandals to match any dress or mood you may have on your wedding day! There are ideas for beach wedding sandals, formal wedding sandals, vintage wedding sandals, causal wedding sandals and more!


With a few easy steps you can have a bunch of fun creating one of a kind custom wedding sandals. These custom wedding sandal ideas would also make for a super fun Bridal shower where everyone makes their own formal or beach wedding sandals to wear to the wedding.


As the bride you could also make some custom wedding sandals and give them to your bridesmaid as gifts!


Tuesday, March 27, 2007

Pearl in a Clam Shell Beach Wedding Invitations


Looking for some unique handmade beach wedding invitations? These elegant Pearl in a Clam Shell Wedding Invitations are so easy to make and all of the materials can be bought at your local arts and craft store!


Beach Wedding Invitations


Having a beautiful beach wedding? A beach wedding is the perfect opportunity to create your own artistic wedding invitations with a beach theme.


If you are looking for a fun project to make with your Bridesmaids, then check out the instructions to make your own Beach Sand Wedding Invitations.


Beginners and more advanced artists can easily accomplish these homemade beach wedding invitations.


All of the materials for these beach wedding invitations can be bought at your local arts and craft store!

Thursday, March 22, 2007

Garden Wedding Favors: Ivy Shaped Beeswax Candles


This elegant beeswax candle is perfect for making as a wedding favor for your wedding guests. Working with beeswax candle material is a simple an easy craft. You do not have to have any candle making experience to accomplish this simple homemade wedding favor craft project.

Overall I think this simple Garden Wedding Ivy beeswax candle project should take you less than 30 minutes. You should expect to pay about $20 for materials, but you will end up with a large number of great Garden Wedding Ivy candles.

To Make These Elegant Garden Wedding Favor Ivy Beeswax Candle you Will Need:

Green beeswax sheets size #3 cotton candle wicksIvy shaped cookie cutter
The first thing you need to do is to unroll the green beeswax. Do this on a flat work surface. You may want to go ahead and plug in a hairdryer near you. This will help to gently heat the beeswax any time you need to.

Now, use your Ivy cookie cutter to cut out an even number of shapes from the wax. I like to cut out 10 pieces with my Ivy cookie cutter for this project, but you can do 8 or even 12. Play around with the thickness of your candle so that it works for you.

Now, you need to separate cuttings into two even piles.

From the first pile take one piece of wax at a time and stack it onto another from the same pile and press firmly so that they stick together.

Now, Once all of the wax from pile one is stuck together does the same thing to pile two. You should have two even stack so beeswax.

When both piles are done put a wick between both piles. You will need to press firmly until they are stuck together.

You may find it handy to use the hairdryer at this point to gently stick the Ivy shaped wax pieces together. Do not melt the wax completely. You don’t want to ruin the look of your beeswax. A little heat really will go along way in making the Garden Wedding Favor shapes stick together.

Tips:

You can complete this candle craft project as described before, but add some fun embellishments to make the Garden Wedding Favor candles really unique. I like to cut some smaller beeswax shapes out with mini Ivy shaped cookie cutters. Make sure these will fit onto the original shape. Then press the smaller shapes in place on t outside of the candle. So, for instance you could cut out large Ivy shapes with you cookie cutters. Use a mini Ivy shaped cookie cuter and you have a simple and elegant more three-dimensional look to the whole candle.

Always cut the wick down to about 3/8 inch sticking up over the Garden Wedding Favor Ivy candle. A wick that is too long can be a dangerous fire hazard.

Package the garden wedding favors in small clear bags and tie them off with a ribbon.


Check out more DIY Projects By Rebecca

Wednesday, March 21, 2007

Chocolate Beach Wedding Favors


Looking for some unique beach wedding favors made from chocolate? These Light Houses made from chocolate are a wonderful wedding favor you can give to al of your beach wedding guests.

You can make this beach wedding favor Light House shaped chocolates in one day with the help of your bridesmaids. Be sure to package the wedding favors in those cute clear bags and tie them off with satin ribbons that match your beach wedding colors.

Your wedding guests will really love this chocolate wedding favor.

Whether you have worked with chocolate or not, this is a simple and easy Light House shaped candy projects that anyone can make.

You should expect to spend about an hour making these Light House chocolates. Depending on what type of chocolate you buy, you should easily be able to make a large batch of Light House shaped chocolates for about $30 or less.

To Make Light House Shaped Chocolates You Will Need:

Light House shaped cookie cutters
Parchment Paper
Chocolate (milk chocolate, dark chocolate, or white chocolate)
Nuts
Coconut
M&M’s
Marshmallows
Sprinkles
Dried Fruits
Frosting (optional)
Frosting Tips and piping Bags (optional)

You can use any sized Light House cookie cutter from small to large, depending on the size wedding favor chocolates you want to make.

Now the first step is to Place the Light House cookie cutters on parchment paper as flat as you can get them. This is important so that the chocolate does not leak out from under your Light House cookie cutters. If the chocolate does leak out those you can let it dry, pop it back off the parchment paper, then melt it again and start over. Chocolate is easy to work with since you can re melt it and try again! You don’t have to waste any materials at all.

Now, melt your chocolate over a double boiler. Simply boil some water in one pot and then place another pot on top. Use a Wisk to continual stir the chocolate until it melts into a nice, smooth, and glossy liquid.

Next, Pour melted chocolate into the Light House cookie cutters. Do about 6 chocolates at a time. You will need to work quickly.

Now you need to add your candle, sprinkles, M&M’s, dried fruit, marshmallows, or coconut. You can put in anything you would like to add like nuts, coconut, M&Ms, marshmallows, sprinkles, dried pineapple, etc.

You could also let your chocolate harden a little and put one almond in the middle of each Light House.
Now, repeat this same method filling up the rest for your Light House cookie cutters. I like to make sure I place as many cookie cutters on the sheet pan as possible. You can also use either metal or plastic Light House cookie cutters for this chocolate wedding favor craft project.

To speed up the cooling process put into the refrigerator for 30 minutes. This is optional though. If you want you can simply let the chocolate sit out at room temperature for a while. Do not put the chocolate in the freezer though.

Once the Light House chocolate hardens cut off any extra chocolate that may have leaked out the bottom. Use a paring knife that is really sharp to do this. A paring knife will give you the most control.

Then tap the Light House shaped chocolate out of the cookie cutter mold.

These Beach Light House chocolates make great wedding favor if you put them in decorative plastic party bags and give them out as good-bye favors. I like to tie them shut with beautiful yellow, pink, or purple ribbons.

Use frosting to personalize the Light House chocolates and use them as place cards at your beach wedding reception tables as well.

Use white chocolate to make white Light House chocolates. Try making some of each and putting one white and one milk chocolate wedding favor in each bag.

Check out other DIY wedding projects by Rebecca.
Welcome to Weddings 24/7

Welcome to Weddings 24/7. A blog devoted to your wedding 24 hours day and 7 days a week.